Sev's First Brick Oven
- This is how it began. Underneath the bales you can see some black plastic. This is covering a concrete footing/slab on which the bales rest.
- Embedded in the slab are 7 star pickets. The bales of straw were then impaled on them.
- The hollow in the centre of the bale base has been lined with plastic and filled with sand.
- Reo mesh has then be tied on to the top of the pickets to provide strength to the slab that will be poured on top.
- Form-work has then strapped around the base to allow for a 100mm concrete slab.
- The mix for the slab includes perlite (instead of aggregate) to improve insulation.
- Once the slab has set, and form work removed, two layers of 50mm thick pavers are laid on top.
- Pavers are laid with the bevelled side facing down.
- This gives the floor of the oven a nice smooth surface.
- I worked out the center of the oven. Stuck down a washer and then started laying the first course of bricks.
- I've used recycled red clay brick.
- The first course has been laid standing up. This gives a bit of height to the cooking space.
- I seem to remember reading somewhere that laying the first course this way is a Neapolitan style oven.
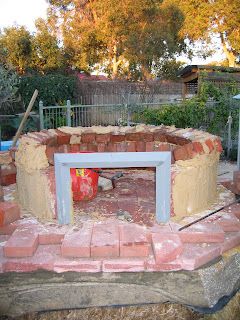
- Here you can see the jig being used to place each half brick at the right angle to give a nice smooth and even dome.
- I think that the next course became quite tricky. They didn't stay in place long enough to allow the mortar to grab and kept slipping off.
- To finish the dome I created a platform on which a dome of sand could be molded.
- To make it easy to clean up, I lined the floor of the oven with a tarp.
- A bit of chipboard, propped up on some bricks created the platform.
- Once the sand on top of the platform was molded into what looked like the right shape, the bricks where then set in place around the dome mold.
- With the dome bricks locked in place, I waited for the mortar to set over night, then removed the platform and mold.
- I ended up rendering the dome, mainly as a way of using up left over mortar. I think this helped to seal up any little cracks, and made it looked a bit tidier.
- Being a pretty impatient bloke, I started firing the oven up straight away.
- The processing of tempering the oven took about a week.
- I lit a series of five fires leaving the oven to completely cool between each fire.
- a handful of newspaper
- newspaper with a bundle of kindling
- a small fire with one substantial piece of wood
- a med size fire with a few substantial pieces of wood
- a large fire
- This is how it ended up.
- The dome has been covered in a layer of rockwool insulation, chicken wire, and a another coat of sand/cement render.
- After two years of weathering and a fair bit of use, it's still in the same condition.


