Sunday, October 31, 2010

Food! Glorious food!

I love food!


I love preparing it and sharing it. I love learning about food and reading about it.

Most of all I love eating it.


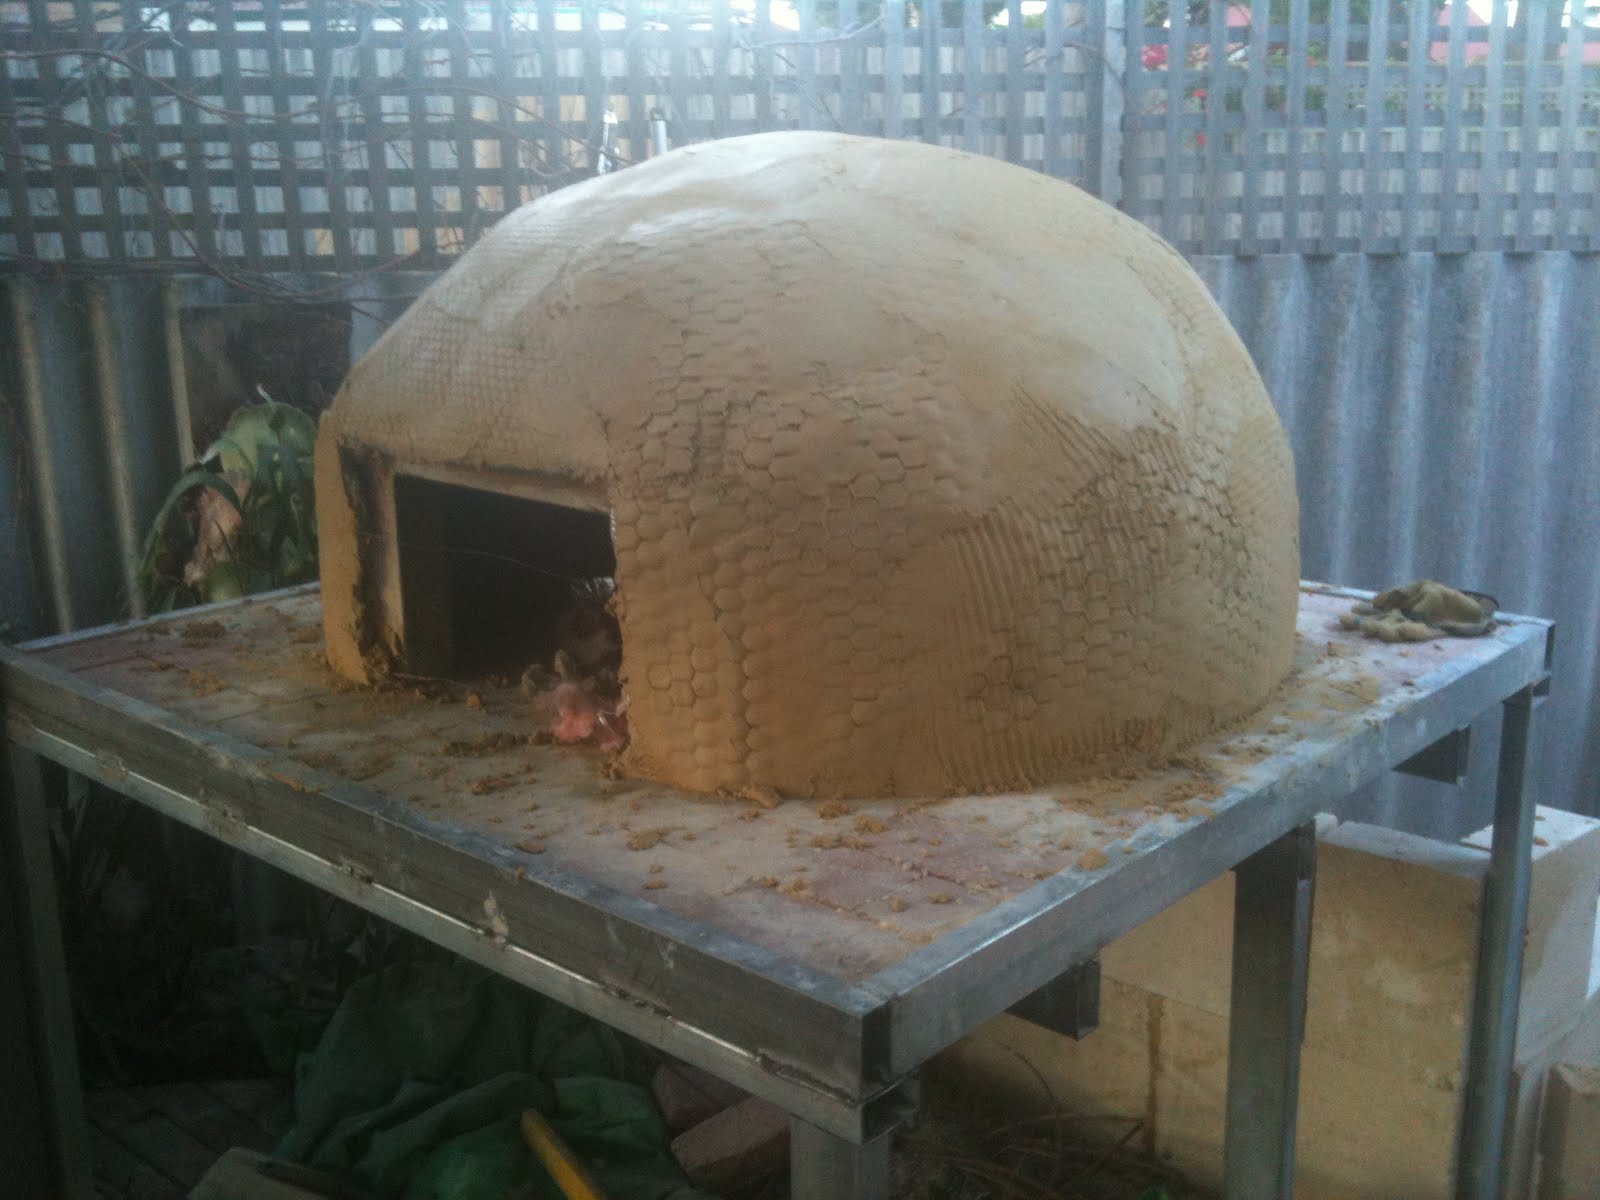
Last holidays I built a Neapolitan style brick oven in my back yard. This has cooked many beautiful pizzas for my friends and me, but I have been really keen to try new things to cook in it. So in pursuit of this, a mate and I went to a sourdough making workshop a couple of weeks ago.


It was great. I came home with a beautiful new book all about sourdough, some instructions on bread making, a bag of sourdough starter and a whole lot of inspiration.


The following weekend I cooked two loaves of tasty bread in the brick oven. It smelt beautifully fresh and a bit smokey; and looked really good! It tasted sensational! As soon as it came out of the oven, I excitedly invited my neighbours over to share it with me.


Since then, I've made a few batches. Today's was the best so far! I was having some friends over for lunch, so this morning I fired up the oven ready to cook up the lamb. To make the most of the heat in the oven, I popped in a couple of sourdough loaves and some rolls. Twenty minutes later, fresh bread to have with the roast lamb!


Smiles all round!


The first page of my teacher's book had the following quote on it. I think it's a corker.


We need the same things to bake bread that we need to build character:

We need the right proportion of ingredients – not too much of this or too little of that.

We need an animating principle, like the yeast or leaven – something to enliven us, a passion.

We need to be kneaded, mixed well by the slow, rhythmic patter of everyday life.

Periodically, we need to rest in a warm place with a towel over our heads.

We need to be punched down, sometimes at the peak of our rising.

And we need to be tested in the fires of suffering.

Ultimately, our lives are without meaning until we’re broken and shared.

We’re not meant to sit on the shelf but to be given away.

Father Dominic Garramone, On Bread and You


Yoke's web page is worth a look.

wildsourdough.com.au

Monday, July 12, 2010

"Pizza to live for!"


The Pizza Eaters have been and gone! Beaut to share a meal with such a great group of characters. Clancy's sprawled out exhausted by all the attention and with a very full belly having hoovered up all the scraps that have been left at muzzle height.

The oven's performance was all that I'd hoped for. It seems to be even better than the first one I built. I think that this is mainly down to the location. Easy access to the kitchen and eating area makes the experience a much more sociable one for the cook.

While this oven is a bit smaller than my previous one (by about 100mm) it's still plenty big enough. Cooking two pizzas at a time is a breeze. I recon with a bit more skill development I could certainly cook up to three or four at a time. Not that there ever seems to be a rush.

Pizza making enourages lots of talking. As everyone gathers around the bench to create their own culinary master-piece there's a lot of talk about topping selection, the days events, the latest news......

Everyone leaves happy. They've got to create their pizza just the way they like it. No complaints.

Sunday, July 11, 2010

First Fruits


With the chimney up last night, it was time for the oven to start producing.

Regular readers will remember the mistake I made, when finishing the dome, of not covering the sand mold with a non-stick membrane. This resulted in some loose sand stuck to the roof of the dome. A wire brush on the end of the cordless drill seemed to work well to tidy this up. A good fire that creates plenty of air movement should get rid of any other loose bits of sand so that they don't end up in my pizzas.

Oven fired up nicely, chimney worked well. Little bit of smoke escaping out front initially, but once the chimney warmed up and started drawing nicely it seemed to be working very well (phew!)

It seemed only fitting that the first meal produced in the oven should be a Margherita Pizza. The traditional Neapolitan pizza. Cooked perfectly!

This was followed by one of Theo's desert pizza options, the Black Forest. Delish!

Smoke Chamber and Chimney


Made the most of the breaks in the weather yesterday to get the chimney up.

This involved building a smoke chamber in front of the door to capture the smoke and send it up the chimney. I was pretty keen on carrying the curved theme through from the oven to this, but it seemed a bit tricky, so went with a flat top instead. Much easier to lay, and install the chimney.

Was given a beaut, complete, stainless steel chimney by the Lockridge connections. Looks good and had every thing that I needed.

I replaced the sheet of Lazerlight above the oven, with a sheet of Custom Orb left over from a previous project. Reduced likely hood of being affected by heat. Also gave a firm base to fix weather-proof chimney sleeve to.


Next step is slap on final coat of render so that it looks nice and tidy.

Winter Weather

Winter has finally arrived in Perth. Great to see some rain after such a dry couple of months.
The rain has slowed progress down considerably though. I wasn't able to get much done this week at all. Had to postpone the pizza eaters 'till Monday.

Monday, July 5, 2010

Final Render Coats

I got the first coat of render on this arvo. Used 3 bags of mortar mix.
If the chicken wire is a bit loose it makes it's a bit fiddly, so it pays to have the wire as taut as you can get it.
The second coat should go on pretty easily as the it will have a nice firm base to stick too.
The pressures on abit now as the first lot of pizza eaters are coming around on Thursday!

Sunday, July 4, 2010

The Oven | Community

I went up to Lockridge for lunch today. No Leederville, but entertaining all the same! Some friends of mine have moved to the area with the idea of helping others to enjoy life a little more. They're good people. Real people. Humble followers of Jesus. They have a genuine desire to make their community a better place to live in.

On the first Sunday of each month they run a gardening workshop in the community garden (alongside the local Anglican church). At lunchtime they fire up the wood fired oven in the garden, and cook up pizzas for those that have turned up. This little social enterprise is a great use of the oven. The food it produces, and coffee cart, provide a focal point for people to connect around.

I learnt abit about gardening from Harry the Horticulturalist, got to catch up with old friends, met some new ones, and enjoyed a delicious margherita pizza straight from the oven. The coffee was pretty good too.

Insulation | Part 2


I fitted the insulation this morning. Took about an hour. The piece of rockwool I got was just a bit too small (should have got 3 square metres) so I had to scrounge a bit of roof insulation from a skip bin on a building site. I've checked the specs on-line and I'm confident it will stand up to the heat.

I draped the insulation over, cut out a few triangle sections to make it fit the dome, then used tie wire to 'suture' the joins.

I've covered the insulation in chicken wire, to give the external coats of render something to hang onto. The method for this is exactly the same as for the fitting of the insulation. I used scrounged chicken wire, but ran out and had to buy a bit more. This was finer wire (13mm mesh/0.56mm wire) and was much easier to work with.

At the door, I've folded the wire back around the insulation, then joined the two sides with a couple of lengths of tie wire. It doesn't matter about the edges of the insulation around the door as this will be covered up by the walls of the smoke chamber. This will be added after the dome has been rendered.


Saturday, July 3, 2010

A bit of Cosmetic Work


Today my dad gave me a bit of a hand to start building a retaining wall at the back of the oven. This will become a herb garden where I can grow basil for my margherita pizzas.

I used the left over mortar to tidy up the outside of the dome. Because I'm not that fussy about how I split the bricks when making the dome, there was a few divots that needed filling up. There was also one small gap in the dome that I noticed smoke escaping from when I fired the oven up again last night. A screed of mortar has fixed that up. Now I've got a reasonably smooth dome ready for the insulation to be laid over.

I've learnt abit about applying (and removing!) make up as part of my work this year. I recon today's job on the dome is probably like applying a layer of foundation. Get this layer right and the finish should be fine.

Friday, July 2, 2010

Insulation

Managed to track down some insulation today. Big thanks to Gary at Right Homes for helping me out with this. Gary and Anna built my house. Great builders, and also just beaut people. Even six months after the build has finished, Gary was still keen to help me out.

Gary recommended that I use rockwool insulation in the wall cavity of the house as a way of maximising the effectiveness of its passive solar design elements.

This product is also spot on for insulating the oven. It's made from a mixture of rock and recycled building material. It's non-combustible and will withstand temps up to 650 degrees.

Monday, June 28, 2010

First Firing


Ducked home tonight and whipped out the mold. Dome looks good!

Scraped what sand I could off the roof of the dome and then cleaned up the floor. That did mean squeezing my top half into the oven to scrape the floor with a trowel.

Then it was time to light the first fire. Modest admittedly. Four sheets of newspaper...but the first fire none the less.


Sunday, June 27, 2010

Timing

This is the third weekend that I have worked on this oven. The days have been pretty casual, still allowing for a sleep-in and lazy breaky whilst reading the paper.

On the first weekend I built the metal base frame and set it in place.

On the second weekend I finished off the base by laying the cement fibre sheeting and a layer of pavers.

During the week I did a few little jobs in the evenings to make sure that everything was ready to get the dome built this weekend

This weekend I whacked up the dome. It prob only took about 6 hours of actual time on the job.

Next week I'll have a bit more time on my hands. My plan is to have the oven finished by the end of next week. That will mean:
  • Covering the dome in insulation, chicken wire and render
  • Building the smoke chamber and installing a chimney
  • Laying some slate around the outside of the dome.
We'll see how it goes!

Some thoughts on the Dome


As you can see, at this point things aren't looking very pretty.

I've used up left over mortar to start a render coat on the outside. I don't really think that this is necessary, as there is still a layer of insulation to go on prior to the finishing coat of render being applied.

A coat of render at this stage though,will
  • use up left over mortar
  • seal up any gaps between the bricks
  • even out the dips and hollows of the bricks to provide a consistent thermal mass layer.
Sunday evening. The dome has been laid in a weekend, the dome mold is still in place to allow the mortar to set the bricks in place (I'll prob pull it out tomorrow night), and the sight has been cleaned up.

My back is aching, my hands are stinging and my hamstrings are feeling pretty tight from bending over all weekend. I'm feeling pretty content that I've created something useful and got some exercise at the same time!

Building the Dome | Part 3

Once the dome mold is set up, it's just a matter of setting the rest of the bricks in place. I kept going in concentric circles, setting each brick in place as I went.


When I got to the last few bricks, I had to knock a few edges off them to make them into wedge shapes so that they would lock together to support the dome. Then it was just a matter of getting as much mud in between them as I could to fill up the gaps.

I'll leave the mold in place overnight to allow the mortar to set the bricks nice and firmly in place.

Building the Dome | Part 2


Once the dome has got to this height, the bricks won't stay up.

I had to build a platform inside the dome, on which I could build a dome mold out of sand.


To do this I used a couple of lids off meat tubs, set up on a couple of layers of limestone blocks. Turned out to be just the right height.

I then packed the gaps with some fertiliser bags, and shaped the dome. The dome took two 10kg bags of sand.


Postscript: In hindsight I should have used a light (8:1) mortar mix to make the mold as suggested in Russell Jeavon's book, or covered the sand in wet newspaper or plastic. There is now a loose layer of sand on the ceiling of my dome that I am going to have to get off somehow. I think this is going to have to involve getting the top half of me in the oven with a wire brush on the end of a cordless drill!

Building the Dome | Part 1

Once the first course has been laid, the jig comes into it's own as I lay the next 3 to 4 courses. After about 4 courses, the angle of the bricks becomes too great for the brick that is being laid to stay put long enough for the mortar to stick.
Then it's just a matter of going a round and a round setting each of the bricks in place.

Some Brick Laying Tips

  • Ensure that you mortar mix is not to wet & not to dry. It should just hold together, but get creamy if you work (slap it around) it abit.
  • A dribble of detergent in the mix will make it more workable
  • Make up small batches at a time. I've used a Cockburn Cement Creme Mortar mix. It's one of their dry mix products and comes in 30kg bags ready to go. You just need to add water and mix it up.
  • I used 4 of these bags of mortar to lay the bricks for the dome of this oven.
  • I plunge each brick into a bucket of water just before I use lay it. I helps the mud to stick to it.
  • Watch your hands. The lime in the mortar makes abit of a mess of your hands, and is pretty painful when it comes into contact with any wounds. If you've got soft pen-pushing hands like mine, I'd suggest using a barrier cream and gloves.

Laying the First Course

Easy as! A line of mud around your marked out circle, a wedge of mud on the long edge of each brick, and away you go.

I've drilled a couple of teck screws in to each side of the door frame. This will give it something to tie it into the mortar of the wall.

I set aside the weekend to lay the dome. During the week I made sure that the dome and door was marked up. I had my bricks split in half and piled up next to the site. I'd bought 3 bags of mortar mix (turned out I needed another one). Every thing was ready to go as soon as I dragged myself out of bed on Sat morning.

Marking up the Dome and Door

Now that I've got my centre point, I can now mark out the inside edge of the dome on the base. This will provide me with the guide for laying my first course of bricks.


Once the dome has been marked, it's time to position the door. Again I've used patio tube for the frame. This door frame has been made to suit the door that I will be using. It's off an old Metters stove. It's a bit smaller than I would like, but it'll do the job, and should look pretty good.

The Jig

This is the jig I use to place the bricks in just the right spot to get a nice even dome.

It's made from 10mm steel rod, with a piece of 40x40 angle welded onto it at right angles.

The length of the jig will determine the size of your oven. It determines the radius of your dome.

For this oven, I'm using a jig 500mm long. This will give me an oven with a diameter of 1 meter.

This is a bit smaller than the 1100mm diameter of the first oven I built, but I still think it'll be big enough.


The next job is to find the centre of the dome and mark it.

I've set my dome back a bit from the front in order to provide room for the smoke chamber and work area.

Once I got my mark, I stuck down a 10mm washer to stabilise the jig as it pivots.


Footnote: The washers didn't last into the second day of laying. I ended up drilling a 10mm hole in the brick (to about 4mm deep). This worked much better.

The Base | Part 2


The top's base is a sheet of 18mm compressed cement fibre. I've laid a single course of 50mm pavers on top of this, with the beveled edge down. This will give a smooth surface to the base of the oven.

I'm taking a bit of gamble with just having one layer of pavers, but I reckon it'll be ok. It will just mean less mass for the heat to sink into and release from. I don't think that this will be such a huge issue for a back yard oven.


At this point, all I need to do now to finish of thebase is to split the pavers on the edges to ensure a nice fit inside the steel frame of the base.


The base was finished off on the second weekend of the project. Ready to lay the dome

The Base | Part 1

For this oven, I've decided to make the base out of steel. I'll then clad it with pine decking left over from the main deck.

I've used galvanised patio tube.
Obviously the base of the oven can be made of anything. All it does is hold your oven up at the right height. I'm not much of a brickie, and the straw bale option that I used last time was a bit too time consuming and messy. I find steel nice and easy to work with. Easy to cut and weld to just the right size and shape.

The top is 1500x1500mm square. This will be just the right size to fit the oven on and still give some room at the front for a smoke chamber and a small work area.

The legs are patio tube also. Set into the ground with rapid set concrete at about 400mm.

The top of the base will sit at about 1000mm from the patio decking. I've found that this is just the right height for me to be able to stand just back from the oven door and see into the back of the oven.

This base frame was made and set in place on the first weekend of the project.

Saturday, June 12, 2010

Getting Started

Before you begin you'll need to think about:

Resources

Design
  • I prefer a simple dome design with an internal diameter of 1100mm. This seems to be the best size for average back yard use.

Location
  • My first oven was out in the open, so a flue was not necessary.
  • However Mark II will be partially under the cover of the back patio, so I will have be make up a smoke chamber with a flue stack.

Materials
  • I prefer to use found or recycled materials where I can. For the base of my first oven I used straw bales that I later rendered.
  • The floor of the oven was made up of a 100mm layer for concrete with two layers of paving bricks on top (beveled side down so as to provide a smooth, flat cooking surface. I used about 50 pavers.
  • The bricks for the dome where what we call 'recycled reds'. These bricks had been a house, then a drive way, and are now an oven. I used about 50 full bricks.
  • The mortar that I used was a basic brickies mix. No special additives or secrets.

Tools for the Job
  • I made up a 'jig' for setting the bricks of the dome in the right places.
  • It was a piece of rod the length of the radius of the oven (i.e. 550mm) with a small piece of angle iron welded on the end.
  • A brick bolster and small mallet is the perfect combo for splitting bricks into just the right size.
  • Mortar can be easily mixed in a wheel barrow with a shovel. If you have access to powered cement mixer it may make it a little easier.

Finish

  • I simply covered the completed dome in rockwool insulation, a layer of chicken wire and a couple of coats of sand/cement render.

Welcome

I built my first brick oven just on two years ago. It took me about six years of thinking about getting around to building it, and a weekend to build.

A few people have been asking about my wood fired oven. Questions like:
  • How hard was it to make?
  • Did it take long?
  • What sort of bricks did you use?
  • Did you use a plan?

Fortunately, I had the fore-sight to take a few pictures as I went. Today I've bitten the bullet and decided to put the pics, and a bit of a story about how I built it up on the web to make them easily accessible to who-ever might be interested.

Today's been a bit of a busy day. I started on my second brick oven at the new house. Clancy's collapsed in a heap on the floor (his favourite way to spend a bit of free time). I'm feeling a bit stiff and sore, so this will probably be all I post today.

My plan is to share the process of how I built my first oven, as well as the progress I make on Sev's Brick Oven Mark II.